
I just made a music video – from start to finish – in 3 days.
Without skimping on preparation, screenplay, filming or cutting.
How? I’m going to tell you.
I’m going to share my creative process too: how I came up with ideas and why I made the choices I did.
Communicating and taking care of the client are going to be recurring themes.
But Before we begin
I got this job through a client and friend of mine.
So I want to highlight this: nothing is going to land you as many jobs as connections are. You want to be a great human being, even before being a great photographer.
Be cool to people.
(There are a couple of cases in which this doesn’t really apply, and if you are in that line of work you already know. But let’s try and be cool to people anyway.)
The Job
The client is an emergent singer and songwriter.
The music video was intended to be around 1 minute long and release alongside a single, which was due to drop in just a few days.
This extremely short deadline was the first thing they mentioned, asking if it was something feasible. I said yes because I knew I could. Had this happened when I was just starting out, or at a busier time, I would have probably said no.
You don’t want to promise something you can’t deliver.
Approaching It the Professional Way
After accepting such a job there is no time to lose.
The first thing I did was to ask the client for everything they could tell me about their song and their ideas for the video.
They sent me their full song, mentioned the location they wanted to shoot it in, told me they wanted the video to be vertical and they wanted to do lip sync.
Clearly this was not much, but it was enough for me to get started.
I knew now I’d have to ask many more questions.
We didn’t have time to meet, in fact this was all so fast that we met for the first time on the day of filming, so all of our prior communication took place through texts and voice messages.
Voice messaging is something I changed my mind about with time and experience.
I used to think it was ‘not very professional’ and that it was best for clients or even potential clients to have all the information they needed from the photographer written down, so it’d be easier for them to find it if they ever were to forget something, or just wanted to double check.
Voice messages are not as easily accessible as texts, that’s just a fact.
But a voice message is also more personal. You communicate in a different way. Your client can hear your voice and really get a feeling for you. It feels more intimate. It feels more real.
And I like this.
It makes the exchange much more human to me.
So I voice messaged them to ask build-up questions.
I started easy, asking if they had any preference in terms of mood, what the song meant to them and how they wanted it to feel.
As I did this, I explained why I was asking more questions, letting them know the more I knew and understood them and their idea, the better I could match it and deliver.
This way I showed the client 3 very important things, without ever needing to state them:
- I was taking it seriously;
- it wasn’t about the money, it was about delivering something they would be happy with;
- no time talking to me would be wasted.
Because of this, they decided to take their time and really think about things.
Wanting to answer me the best they could, they found answers for themselves first.
Day 0 – Evening
They came back to me a few hours later with most of the information I needed.
And this was still Day 0.
No screenplay or any real form of planning could have taken place without this.
Not unless they decided to let me just do whatever I came up with.
As I read/listened through their messages, I took notes to make sure I wouldn’t miss or forget anything, and I could always look back at them as references for any idea I would come up with.
After our conversation, I started thinking about what they had said, looking in my head for ideas to translate what they wanted into video.
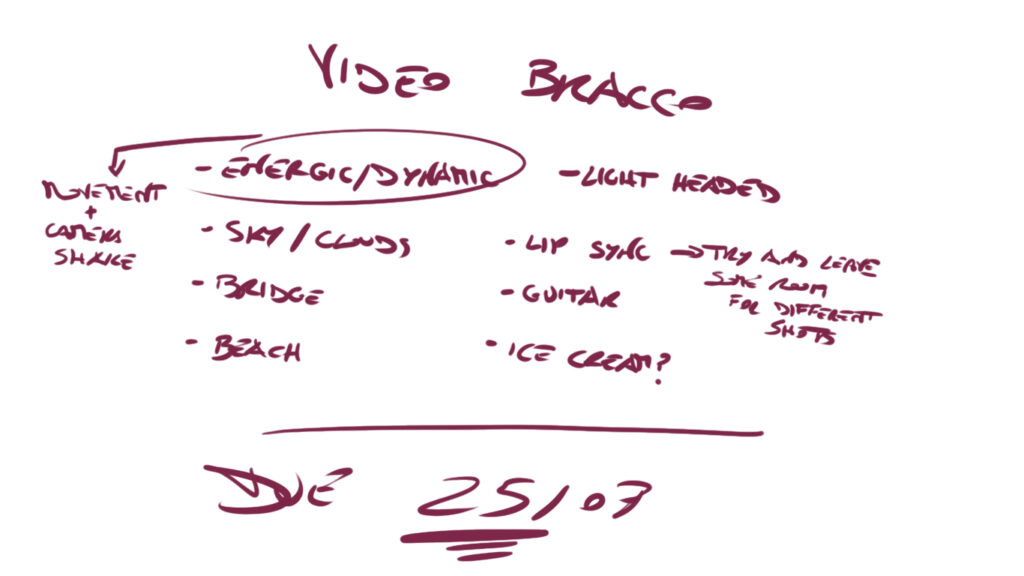
They wanted the video to feel dynamic and full of energy.
And when talking about video, feel isn’t usually in what you do, as much as in how you do it.
So personally I decided to achieve this feeling with camera movement: I was going to do away with static shots completely in favour of a constantly moving camera. Film handheld, keep the camera shake in.
The location they had chosen was a bridge which is quite unique to our city.
The video needing to be vertical meant there was little room to show things around the talent, at least in horizontal plane.
I needed to go very wide, with deep depth-of-field (so a small aperture) to keep most of the background in focus, and use framing to take advantage of the vertical aspect. And if I needed to show more, it would be done either by having the talent move or by moving around the talent.
They had described the song to be happy and summery, so filming in full daytime with some takes at the nearby beach were no-brainers.
At the end of Day 0 these were my notes.
Day 1 – The Screenplay
Starting Day 1 I felt pretty safe, thanks to all the prepwork I had already done.
Now I had to listen to the song.
When working with music that features any amount of lyrics I always actively listen to it, paying attention to the story it’s telling, key phrases and keywords. You want to create visual elements that match, relate or hint at the song’s story and lyrics.
There is always going to be the rare exception to this, but when working on music videos, you generally really want to do this.
In this case it was a love song, and the video would run from the last verse leading into the pre-chorus to the bridge right after the chorus.
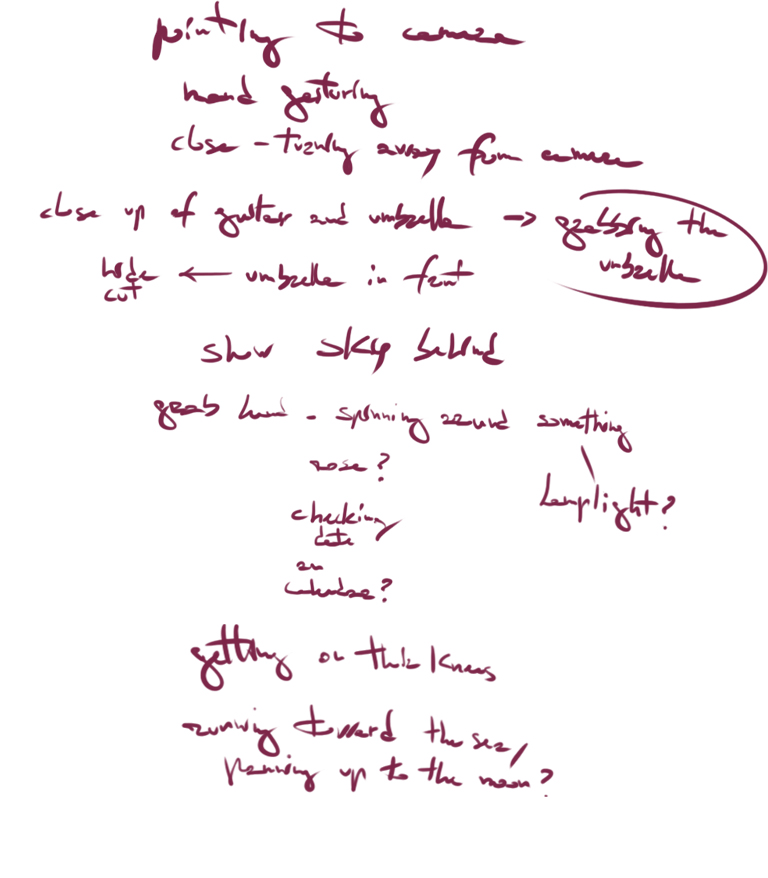
The chorus itself started with a sentence about rain. So I wanted to create a visual hook to mark the transition and show the viewer this was it, and that would also tie in with the lyrics in a way that would make you feel the lyrics as much as you heard them.
I decided to have the talent open an umbrella. Which is exactly what you would do if it were to rain.
You think umbrella, you think rain.
It’s instinctive, that’s why it works so well.
But I didn’t stop there.
I decided I would have the talent open the umbrella towards the camera, so as to cover up the frame and use it to hide a cut.
Basically he opens an umbrella here, but when he drops it he’s there.
Having the whole scene change is a way to emphasise the transition from pre-chorus to chorus: we’re entering a different part of the song and I mirror it by visually taking you in a different place.
I’m basically hitting your subconscious at this point, but it works.
And this actually gave me a perfect opportunity to add one more element in: text. Lyrics. For those few seconds the umbrella covered the frame, there would be no nothing else.
It was the perfect time to highlight the lyrics, by having them appear onto the umbrella.
These were key elements and would be my priority when filming.
Afterwards, I made a list of motions, gestures and elements that I related to each sentence of our minute of the song, ending up with this.
Note: I didn’t take any specific note about framing because I had it all in my head, so I felt like I didn’t need that kind of notes.
Where you read ‘bridge’, ‘beach’, ‘sky’ in the Day 0 notes – I had framing ideas for each of these elements at this point.
Always Check
After I had collected my thoughts and refined my ideas, I shared most of them with the client.
It was important for me not only to have them know beforehand what we were going to do, but also to make sure they liked it.
We have been lucky to hit it straight away and be on the same page. Were it not the case, I would’ve had to adjust. Clear up what wasn’t to their liking and why, and ask more questions, focusing on understanding their idea and vision.
Day 2 – Filming
Having the client know what we were doing was pivotal in having them come prepared.
Come morning of Day 2 we discussed and made a list of props to use.
As soon as we met, we checked to make sure we had everything.
We met close to the location, and reached it together. There I told them how I wanted to frame each shot. When they couldn’t see it in their head, I took some pictures with the exact framing I had in mind to show them.
I had more than earned their trust by this point, and I was sure enough that our ideas matched.
Still you can’t just go “trust me, bro”. Not only is it not professional, the client should never be left to guess what you are doing. The same way you should never have to guess if you got it.
You check with them. You communicate.
Having to do lip sync, we used a portable speaker to play the song, so they could sing along in perfect timing.
When it came to directing, I left them all the free room that I could.
Basically I just suggested they try and move and gesture in a way that would emphasise the lyrics as they sang, but that was still them.
You don’t want your artist feeling stiff or moving like somebody else.
We filmed a few takes for each shot, and between takes we would also communicate. I would show them what we had just filmed, or part of it, and I would highlight what I liked or what I wanted to see a bit more of. I would also tell them if there was something that didn’t really work or didn’t look too good on camera or to my eye, and show them.
They would listen and tell me how they felt about everything, too.
If they liked a thing or disliked another, what they wanted to try and do differently on their part, but also what they wanted me to try and do differently, sometimes.
By communicating in such a way, and by doing these multiple takes, I made sure we’d have a wide variety of movements and interactions, and that it all matched what we wanted.
We had around 3 hours to do all the filming, and I wouldn’t have moved from one shot to the next if I didn’t think we had it.
We managed to wrap it all up in around 2.
As I got back from filming that evening, I immediately transferred the clips to my computer and opened the project in my video editing software. I lined up every clip with the music track and color coded them so that every take of the same scene were in the same color.
Day 3 – Cut and Delivery
No matter how long you do this job, waking up to a project with everything already set up for cutting feels great, and it allows your brain to focus on what’s important without distractions.
For this project I worked with two timelines/sequences.
One was the one I had set up, with every clip lined up and color coded, which I used in place of the media pool, to have every new clip I’d insert always already lined up to the track.
The second was the actual video I cut.
I replayed every clip along to the music from start to finish, copying anything I liked from one sequence to the other.
When I had different shots I liked for the same section I would just put them on top of each other in different layers, so I could swap between them to see which ones fit better and cut seamlessly from one to the other.
After I had a rough selection of which takes went where, I put in all the image adjustments and added the text overlay where I needed.
Then it was just fine tuning cuts so they would flow well with the music and with each other.
Having multiple good takes on top of one another helped me a lot when I decided to add more cuts than anticipated – which I did.
All in all this took just a few hours.
As soon as it was done I sent the video it to the client for review.
They had 2 notes for me: they wanted to try and have the text a different color and asked for a couple of clips which they particularly liked to get a bit more runtime in the final cut.
In the span of 10 minutes we tried of couple variations and got from first cut to final.
Here you can find: the song, the artist’s Instagram and YouTube.
The video is out now.
I hope this content has been informative to you, and if you’ve ever filmed a music video, please feel free to share them here, I would love to see it!
Leave a Reply